NetSuite is a cloud-based ERP software that provides sufficient incentives to businesses. Saved search in NetSuite is among its most valuable functions, encompassing a complete suite of financial, inventory, and customer relationship management tools, which significantly enhances the company’s productivity and ensures that the company has up-to-date information in all domains.
A NetSuite saved search is an essential feature for businesses that want to gain real-time analytical data to enhance their business operations. Creating saved searches in NetSuite enables users to search and filter from huge sets of data through which they can generate unique and customized reports, spot the ongoing trends, and make well-informed decisions based on the current information.
How Saved Searches In NetSuite Make A Difference in Your Business
NetSuite Saved Searches impact your business operations by serving all the different domains with each type best suited for the specific needs of specific departments. As one of the powerful tools in the NetSuite implementation service, saved searches allow users to retrieve, filter, and analyze real-time information across all modules. The following saved searches are frequently used by companies within NetSuite to optimize their operations.
- Activity Search: Within the Oracle ERP processes, NetSuite activity saved search records tasks, events, phone calls, and all the important business events and customer engagement. This enables users to gain insights into the business processes and make informed decisions. ,
- Customer Search: NetSuite’s Customer Search tool stores crucial information such as employees’ contact details, purchase history, and payment terms, which can be filtered, sorted, and grouped in various ways. These saved details can be used anytime in the future to analyze and evaluate the data and make an informed decision.
- Item Search: This feature saves a record of items based on their pricing, sales, stock levels, and other relevant information so that the product history can be easily evaluated anytime, and the company can evaluate the performance of all its products and services.
- Opportunity Search: Stores information about potential sales, the probability of winning the deal, and further identifies top-performing sales and analyzes the company’s sales performance.
- Task Search: The feature enables users to filter data based on task type, status, and priority. This tracks the work performance and enables the company to efficiently handle the appointments, phone calls, or meetings with no hassle.
- Transaction Search: The feature manages financial tasks that include creating purchase orders, sales orders, and invoicing. This further enables the handling of cash flows and the recording of revenues and expenses in a timely manner.
Furthermore, NetSuite saved search plays a crucial role in business intelligence and automation for the following reasons:
- Improved Data-Access Control
- Customizable Reports meeting specific business needs
- Enhanced operational efficiency by automating data retrieval tasks
- Informed decision-making that closely align with the business goals
- Increased cross-team collaboration through instant access to essential KPIs across all departments.
How To Create A Saved Search in NetSuite
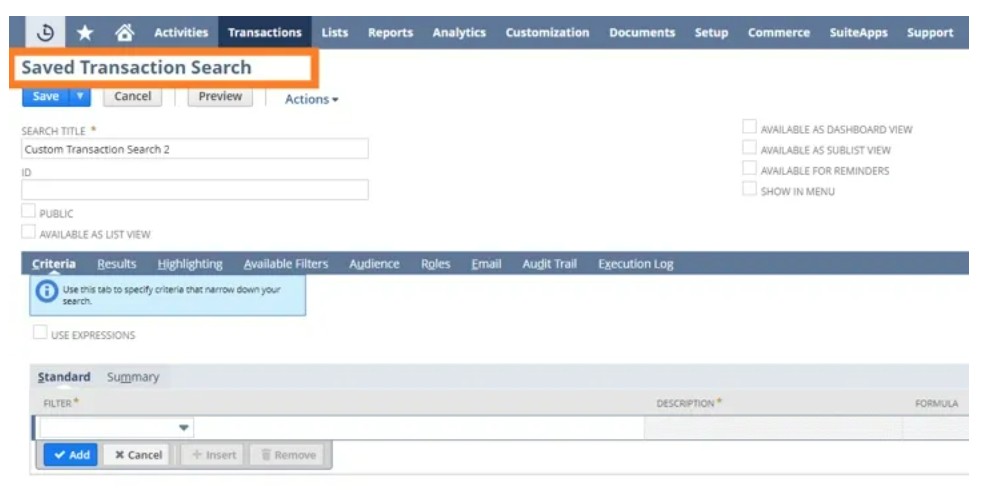
For creating saved searches in NetSuite, first figure out the type of record you need to search, which might be a customer, a transaction, or an item. Secondly, specify the conditions for your search, like a specific date, and incorporate these filters to narrow down your search to get specific and desired results. You can also specify the column you want to see, like customer name or transaction type, to sort the results based on your preference.
After specifying the filters, you can save the changes and run them anytime you need. You can also automate the process that would increase the efficiency of your operations, enabling your business to stay up-to-date with the recent information.
NetSuite Saved Search- Step-by-step Guide
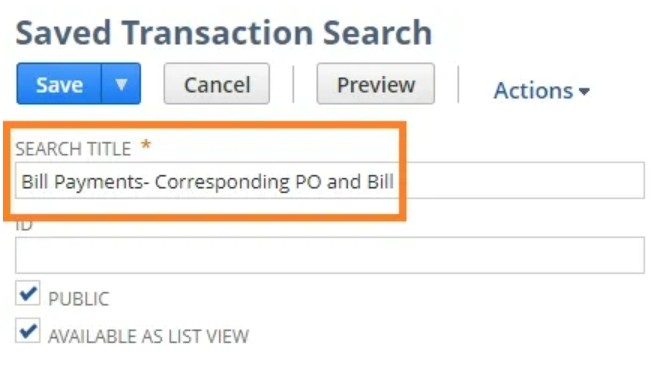
Start with an easy yet descriptive title. For this example, we’ll name it “Bill Payments – Corresponding PO and Bill.”
NetSuite will automatically generate an ID for your Saved Search, but it’s always better to set one buy yourself so that you can remember and manage it easily later.
A helpful tip: always begin the ID with an underscore because NetSuite adds a prefix (like customsearch) automatically. For instance, if you use_bill_payments_PO_and_bill, the full ID will be customsearch_bill_payments_PO_and_bill.
If you want everyone in your organization to use this Saved Search, check the ‘Public’ box. To make it viewable in dashboards or lists, also check ‘Available as List View.’

Step 1: Define Criteria For The Saved Search
Criteria help filter out unnecessary data, so you only get the results you want. Without setting criteria, NetSuite will return all records of that type, which isn’t ideal.
Specify Transaction Type
In the Criteria > Filter tab, select the ‘Type’ field to choose the type of transaction, like Bill Payments.

Note: This is different from the overall “Saved Search Type” (which in this case is “Transaction”). The “Type” filter further narrows your search to specific transaction types within that category.
Select ‘Bill Payment’ in the popup, then click Done and Set. Now, only bill payment transactions will appear in your results.
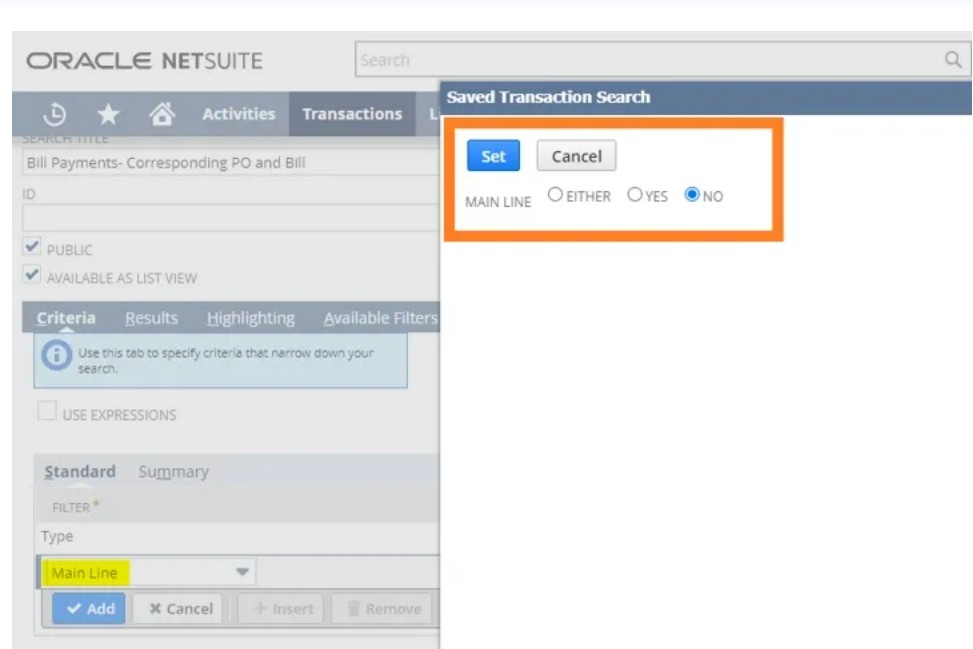
Main Line Criteria
The Main Line setting determines if your search will show only the header (main) line or include all line items.
- Set Main Line = Yes to show only summary info
- Set Main Line = No (our case) to include all line details
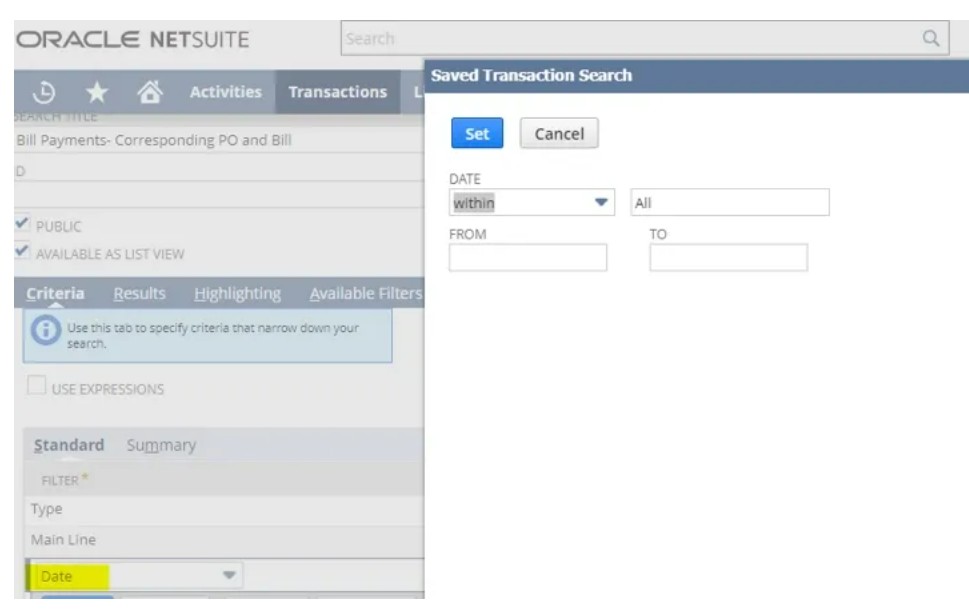
Add a Date Range
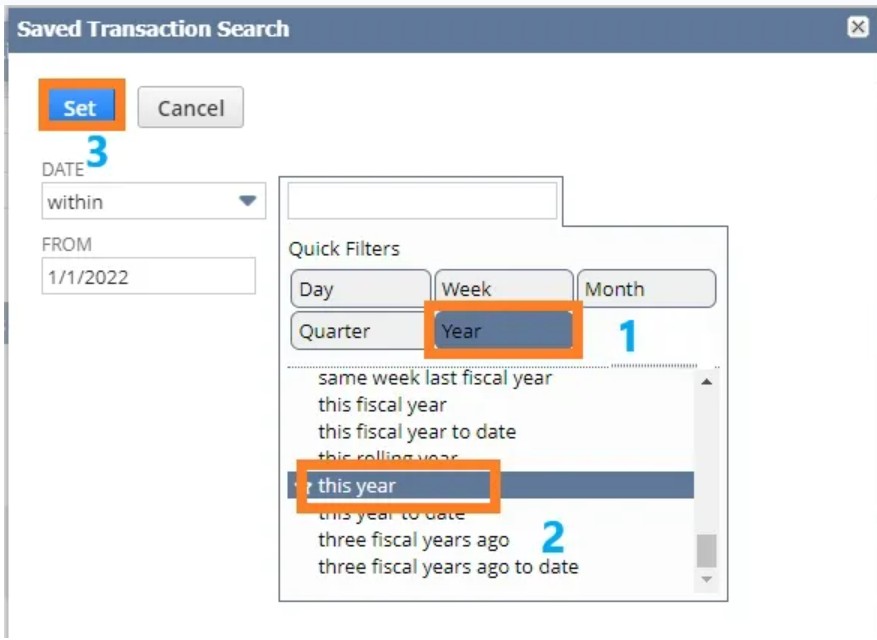
You can define the range by adding dates in the “From” and “To” fields or using advanced options like “This Year” or “Last Fiscal Quarter” from the quick filters.
Step 2: Drill-into Connected Records
Some filters have three dots (…) next to them, which means they allow you to drill into related records.
For example, from a Bill Payment, you can pull in related Purchase Order or Bill information.
Step 3: Customize the Results Tab
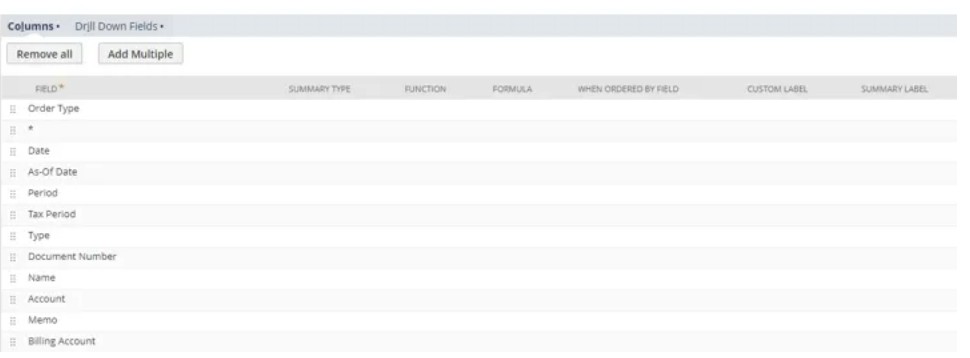
Under the Results tab, go to the Columns subtab. Here, you choose the fields you want to see in the search output.
In this example, we’re adding these columns:
- Date
- Paid Transaction (shows the bill being paid)
- Paid Transaction: Created By (shows the related PO)
- Amount Paid
- Document Number
- Payee Name
You can rename column headers using Custom Labels. For example:
Paid Transaction → Bill Number
- Paid Transaction: Created By → PO Number
- Paid Amount → Amount Paid
- Document Number → Check Number
- Name → Payee
Step 4: Use Highlighting and Filters
Highlighting
Use this to make certain records stand out. For instance, you could highlight transactions over $10,000.
Available Filters
Available filters show up at the top of the report when it’s run. You can add filters like Payee Name to quickly narrow down results. Check ‘Show in Filter Region’ to make it visible.
Step 5: Set Audience and Access
In the Audience tab, choose who can view or use this Saved Search:
- Check Public to make it available to all users
- Or restrict it by roles, departments, subsidiaries, etc.
For this example, we’ll make it Public so everyone has access.
Final Step: Save and Run
Once the above-mentioned steps are adequately fulfilled, click Save and your NetSuite Saved Search is now ready to run and you can now see the results based on your assigned criteria and filters.

The process to create a saved search in NetSuite can be filtered with the following sections:
- TYPE: Enables you to choose the record type or the subtype that you want to create your search around.
- CRITERIA: The record type, specific data ranges, and SQL formulas that narrow down your search to a specific segment.
- RESULTS: It enables users to specify what column headers and row data should be displayed in the search.
- EMPLOYEE TYPE: This filter restricts the changes to be viewed by only the selected audience that is filtered based on the employee’s name, role, department, or group.
How To Choose The Right Criteria For Your Business
- Make your search specific with clear and focused filters (example: status = “Fully Billed,” date range, transaction type). This ensures faster results and information based on your desired criteria.
- Limit columns to Essentials by only incorporating columns that are truly needed. This tip significantly reduces clutter and improves performance
- Use grouping and aggregation formulas to get a concise overview instead of raw data.
- Pull in hidden or internal fields via Formula, or calculate derived values using SQL functions for advanced insights.
- Avoid unneeded connections to keep your report summarized and to the point.
- Make sure to use clear annotations in the description or header to make it easy for other users to understand what each filter or column does.
- Use drill-down links to make navigation easy for the users from a summarized or high-level view to detailed information with a single click.
- NetSuite hyperlink in saved searches enables users to make real-time updates directly from the link without needing to open each record individually.
How NetSuite Saved Searches Solve Common Business Challenges
- PROCUREMENT: The process is often complicated and labor-intensive. Thankfully, using saved searches within an ERP for procurement, like NetSuite can speed up the procedure, improve data visibility, and improve business operations.
2. Supplier Performance Management: Saved searches enable monitoring purchase orders from specific vendors over the past years, and can also be used in tracking metrics such as on-time delivery rates and the percentage of defective or returned items
3. Cost-effective Opportunities: It creates search lists based on purchase orders, unit price, and vendor information of all the items making it easy for procurement managers to pinpoint those specific vendors who have consistently offered competitive pricing and promotes cost-effective sourcing strategies.
4. Automating Purchase-order Workflows: Build a saved search that identifies all approved purchase orders and enhance its visibility by setting up automated email alerts, ensuring timely follow-ups, and reducing subsequent supply chain delays.
5. Ensuring Optimal Inventory Levels: Create a search that notifies about the items that are below their reorder point, along with corresponding lead times and vendor details. This helps prevent stockouts and improves purchasing accuracy.
6. Automating Financial Control: This enables efficient workflows in key finance areas:
● Cash Flow Monitoring
● Cost Management
● Audit Trail Accuracy
NetSuite Saved Search Function
There are several SQL functions available that users can incorporate to refine their search results. The functions include:
- Count
- Min
- Sum
- Max
- Average
- Group
- Date
- Case
Additionally, NetSuite’s saved search allows users to customize formulas using Numeric or Text fields that perform advanced calculations that are not performed through basic SQL functions.
Advanced Technique Of Formula In NetSuite Saved Search
In NetSuite saves search, formula fields can be used go either imit the search results more precisely or to perform operations on them.
Follow the following steps to create a formula in NetSuite saved search:
- Navigate: Reports > Saved Searches > All Saved Searches and click “Edit” on the desired saved search
- Click on the “Criteria” tab
- Add a new filter by opening the drop-down menu and selecting the corresponding Formula option (Date, Numeric, or Text)
- Write the formula using NetSuite’s formula syntax in the FORMULA box and click “Set”
- Preview the results to ensure the formula is working correctly
- Save and run the saved search
How To Copy A Saved Search In NetSuite
Copying a saved search requires the following steps:
- First, go to “All Saved Searches.”
- Navigate to the saved search you want to copy and click on its name to open it.
- Enable the editing mode by clicking on the “Edit” button.
- Click on the “Save As” button located at the top of the screen. This will open a new window where you can enter a name for the new saved search.
- Enter a name for the new saved search and click on the “Save” button.
You have now created a copy of the original saved search with a new name. You can then make any necessary modifications to the copy without affecting the original search.
Why DevTeamPro?
As NetSuite ERP Solution Provider, we provide comprehensive documentation of all saved searches and their underlying criteria, filters, and formulas. By tracking the complete history of changes made to saved searches, we allow users to understand its impact on the business operations with clarity. This enables you to understand all the discrepancies and make informed decisions considering all the different insights. Our skilled team with advanced tips and tricks supports streamlined business operations, risk reduction, and effortless compliance across your organization.
FAQs
Q1: Difference between a saved search and a report in NetSuite?
As the blog explains, a saved search is an advanced, customizable tool to manage huge datasets and narrow down the search based on your needs through applying filters, formulas, and setting criteria, offering greater flexibility in workflows.
A report, on the other hand, has a structured format designed for summarizing data and is best suited for formal presentations with little to no flexibility.


